

Still life with coffee…or how to get sawdust in your coffee. (The miter box and saw were kindly loaned to me by Christopher Schwarz.)
Oh…my aching bones.
On Saturday, I spent most of the day painting the face frames I installed weeks ago, and making, fitting and painting the face frame for the sink and adjacent cabinet – and that one was quite the puzzle.
The sink wraps around the front of the cabinets and there’s a rail across the front to hide the metal sink support; the far edge of that run is against the wall. So there was simply no way to assemble the entire frame ahead of time and slide it into place. So I had to…horror of horrors…nail some of the pieces together. I realize that had I used loose tenons I might have had an easier time with that particular assembly – but I decided on pocket screws, which for most of what I need to make has been an expeditious choice. (Go ahead and mock me; I can take it.)
 And after that little adventure, instead of watching the paint dry, I got to work assembling the upper cabinets for the interior wall. ‘Round about midnight, I opted to sleep instead of trying to hang them (an easy decision, because I didn’t have any long enough screws on hand. Oh yeah – and I was exhausted).
So this morning, after a pot of coffee and a handful of ibuprofen, I wandered around my house looking for something – anything – that was 18″ tall and stable enough to serve as a platform while I hung the cabinets (hard to find good help on Easter Sunday…and anyway, I’m awfully stubborn about asking).
 The closest I could find was a 17″-wide drawer box (no idea what it’s from, why I have it or how long it’s been gathering dust on my third floor), so I rummaged around under my workbench and came up with some 1″-thick scrap (with poorly cut mortises in them…no idea why I kept those). Then, after a quick trip to the hardware store for 4″ screws (no that’s not overkill – 7/8″ through the cabinet support and back, then through 1″-thick plasterboard before getting to the studs), I took a few more gulps of coffee and a deep breath, checked the top and sides for level, and secured the first box in place.
Then slowly…very slowly…I removed my ersatz support, fully expecting the cabinet to come crashing down on my head. It did not.
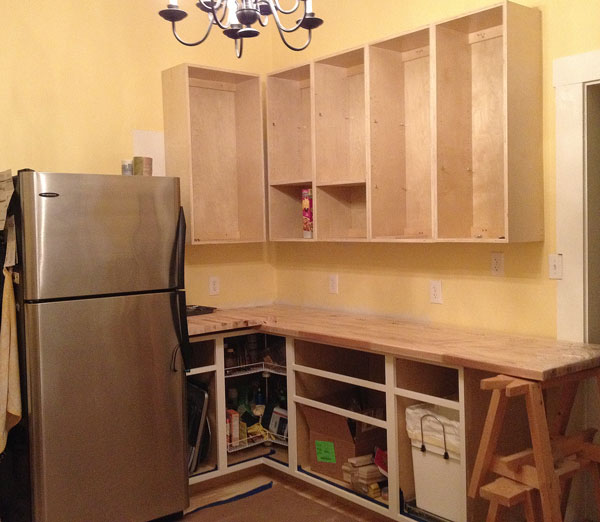 So I screwed the remaining three cabinets in that run to the wall, then to each other. Plus, I hung one wider box next to the refrigerator (that will be a fun mitered frame to make at the corner, and no, that is not sarcasm).
I have one more 42″-tall cabinet to make that goes next to the refrigerator – but at only 13″ wide (so that it matches the base cabinet, of course), it missed hitting a stud. So that’s another trip to the hardware store for a couple toggle bolts. Plus, there will be a cabinet over the refrigerator.
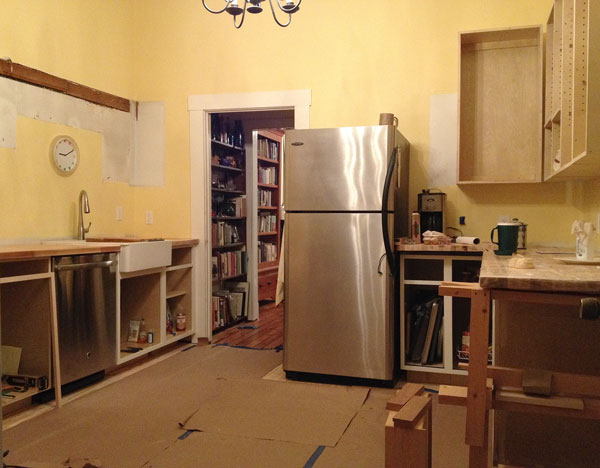
Already, with the cabinets I’ve already installed, I have about 20 percent more storage space than in the old kitchen (plus there’s still the two cabinets to make and install on the interior walls). So this brings me to my conundrum: Should I even bother to make cabinets for over the sink? I quite like how airy and open it feels without them, and it makes the room seem a good deal larger. There’s also the consideration of not having to deal with attaching them to a masonry wall…but there’s a masonry wall to repair if I’m going to leave it exposed; I count it as a wash.
So I guess while I decide, I’ll get started on what scares me most about this entire project: installing the drawer slides.

You seem to have high ceilings. I’d consider putting them in, in essentially the space that’s now white and incorporate some downward light over the sink.
you could always go with open shelving like these
Wait…you want me to both repair the wall _and_ hang stuff on it?! Sheesh. (Actually, I was thinking a long piece of flat metal that projects about 2-3″ out, with w/moveable hooks on it for use as a pot rack or whatever else needs hanging…dried herbs, maybe)
i see what you mean …
i think the peg board makes it look like you don’t have enough storage for your pots, though. so if you don’t want to take out that wood piece, why not start with that, add another piece and do something like this?
http://www.bhg.com/kitchen/storage/organization/pot-rack-ideas/#page=21
I am of the opinion that pocket screws were invented for face frames. I could probably Google what their original intent was, but its early. I vote no cabinets, though as already linked open shelves or something could look nice there.
I vote for keeping the open feeling, though some shallow shelves above the sink wouldn’t be amiss. The idea of hanging a cabinet, any cabinet, with toggle bolts makes me nervous. I’m sure the bolts will hold just fine, but what about the wall itself?
Well, I took down four cabinets there…and the wall didn’t fall apart when I removed them. In fact, they were by far the most difficult destruction project in the entire kitchen. The heavy particle board cabinets were attached to the catch board (that lovely run of wood recessed in the wall) at the top and with masonry nails below. In fact, there are still three masonry nails in the wall that neither I, nor my strong neighbor, could get out! I’m going to have to cut them off with a Dremel wheel, I think.
Well, at that point I think you’re safe. You’ve got a much better perspective, you know, being right there and all.
First off, it’s looking awesome. You should be proud.
Secondly, I’m in agreement with everyone else: open shelves seem like the way to go.
Now I understand that doubles your work but here’s something I wouldn’t have said 10 years ago: wallpaper. While working on our old house in Glendale, we removed miles of wallpaper. Then proceeded to spend the next seven years patching and repatching old plaster (or cinder block since the exterior walls were made of cinder blocks). Just before we sold the house I’d wished I’d thought more about updating wallpaper. I swear it was invented for keeping unsightly masonry hidden.
Another thought is open shelves over a framed out piece of birch plywood. The plywood would cover the masonry but could make a backdrop for cool shelves.
For both options I’m just talking about doing the portion of the wall level with the upper trim on your doorway.
Good luck and I hope this gives you something to think about.
-Shawn
I like your idea of a pot rack. If you already have plenty of cabinet space a good hanging rack is always welcome. I think an open area above the sink would definitely make the room feel larger, and in general kitchen sinks are often placed under a window(if possible). Either way, as long as you can cover the wall without repairing it I would use a storage rack.
I like the open look too. Maybe some shelving on that wall – that would give you some storage of sorts and still keep it open, but the eall wouldn’t look bare. Nice work.
I know this would create a ton more work for you but when I’m doing the dishes, the only thing that makes this chore worthwhile is being able to look through the window to my beautiful backyard. My suggestion: put a window in if you can.
Er…not an option. That wall is 15″ away from a neighbor’s brick wall, and I believe there may be a drain pipe running through the alley at an angle at about that spot, so not a good view!
Kitchen cabinet space is a lot like closet space, one can never have too much. That said, I would hang the cabinets on either side of the sink and to connect the cabinets on either side I would build a variation of this to act as a drying rack. http://www.popularwoodworking.com/articleindex/kelly-mehlers-plate-rack. Wash dishes. Put in rack.
I believe you are familiar with this piece?
The shelves do look nice but you will be dusting them and everything on them constantly.
That’s exactly what I suggested to my realtor when I built the piece…but he wasn’t having it, because it wouldn’t stay with the house when I sold it. (I’ve asked his advice about cabinets or no, and the possibility of a shelving fixture that is affixed permanently to the wall – if he feels strongly one way or another, well, that’s likely what I’ll do.)
Build a piece that stays with the house, looks like the cabinets (same finish etc.) and is permanently attached. That should get your realtor on board. Oh yeah, Modify the bottom so plates can drip dry over the sink. Good luck.
If you are doing the kitchen rehab for yourself, then do whatever pleases you the most. In this case, that sounds like not hanging cabinets.
But if you’re doing the kitchen rehab in order to sell the house faster and for more money, then you should consider hanging more cabinets. Or, at least, consider asking the opinion of two or three realtors to find out what they think.
I bet they’ll say cabinets are going to give you the better return. My wife and I looked at a LOT of houses (over 150) before buying ours. We had lists of things to keep in mind for every room int he house (I take my OCD seriously). Our #1 kitchen question was, “Does it have enough cabinet space?”
If you are doing the kitchen rehab for both yourself and resale, then go with whichever one carries the greater weight.
In my experience, open shelves are a great concept and they look awesome when you first set them up. And then they start gathering clutter. And they get dusty (and you don’t ever seem to find the time to run a Swifter over them).
It’s difficult to see clearly from the photos, but is there a void in the corner where the wall cabinets don’t meet? That space seems to underused, right?
And I highly advise an open rack above the sink that can be used for hooks as a pot rack. I think you might have a Swedish manufacturer in mind by your own suggestion.
Yes there is a 12 x 12 space behind those. I had an upper corner cabinet there before, and hated it. So I opted to not have a corner cabinet and the heck with the 12″ square of wasted space.
I think there will be a rack for hanging pots and pans to the right and left of the sink; still hoping to find the $$ for a hood above the stove.
What type of drawer slides will you be using? They don’t have to be scary- best of luck!
Blum Tandem with…whatever the co calls the soft-close feature. Too tired; can’t remember. (They’re all installed; now I just gotta build the drawer boxes and get those locking devices installed correctly)
Blum 563h, most likely? You made an awesome choice, as those slides have lots of adjustability (and a crazy retail price point- hopefully you got a discount!). I use them every day in my shop.
If you find yourself in need of a Blum drawer jig, I have one or two I can loan.
I believe that’s right (5/8 sides). So…you use them every day, eh? Then maybe you can tell me how much clearance is required under the drawer bottom for the clippy things? (I’m guessing it’s the same as the width of the clippy thing…but I should probably find out for sure before I build the boxes!) And do you recommend using the jig for installation of the clips/rear cutout/rear hole? I was kinda planning on winging it (9 drawers) – is that a mistake, do you think?
For 5/8″ sides make sure you have Blum 563h slides.
Leave 1/2″ beneath your drawer bottom for the clips. By far the easiest method for getting everything aligned is to build your drawers with a shortened back so the bottom can slide in.
The drawers should be 3/8″ narrower in width than your case’s drawer openings, by the way.
The most difficult part will be drilling the recesses in the drawer’s backs to accept the pointy little alignment pins (5mm holes work best, I believe). To make this easy simply remove a pair of slides from your cabinet and, at the bench, place them on an upside down drawer. Tap them lightly so the points mark the location you need to drill your drawer out. Do note that the right and left slide will be in different positions. Also note the adjustment levers at the back of the slides- these adjust your drawer for tilt should the slides be less than perfectly level.
I’m not sure which clips you have, but there are a variety of adjustments on those to make sure everything gets installed perfectly. At minimum, you’ll have some ramps on the clips to adjust your drawer heads should one corner be low. Other versions add side to side adjustment and some allow for depth adjustment, too (for inset applications).
Thanks Eric — very helpful! (I got the new, adjustable-in-all-directions clips, and the slides are 563h.)