

The shower is to the left. Yes, I do still need to run drywall strips around the the door frame and do all the corner beading. And figure out what to do about the gap at the ceiling…which resulted from pulling off the three layers of wallboard that were atop the plaster.
I spent the weekend hanging mold-resistant drywall panels on the non-plastered walls in my bathroom (after hiring a pro to patch and finish-coat the two plaster walls). I can now barely shuffle to the coffee maker and ibuprofen cabinet after two days of running up and down the stairs and ladder. But I had to get it done – Rick Wolf and his team are tentatively scheduled to show up in late January to make the custom-sized shower pan, apply Kerdi to the shower walls and do the tile in there.
I’m fairly brave when it comes to taking on home projects outside my métier…but not so foolish as to think it’s a good idea for me to tackle the job that needs to be water tight. Rick is awfully busy and in high demand, so he’s crazy-difficult to schedule for a small project such as mine. I simply have to be ready whenever he is.
The shower is a 3-1/2′ x 7′-ish space tucked into what used to be a pantry for an apartment kitchen (now the guest and currently only bath) on the backside, and part of a hallway. The door to the shower was formerly the door from said hallway into the bathroom; I cut a new door between my bedroom and the bathroom (and stood in it to take the picture above).
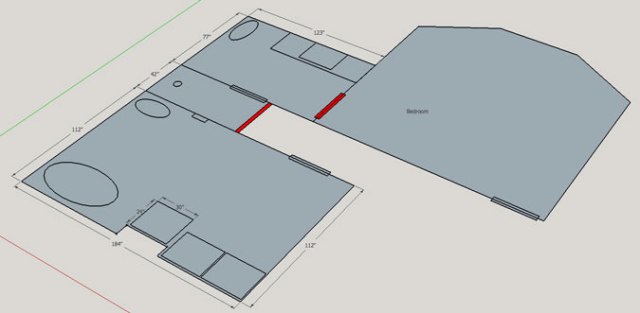
Hey – things are starting to actually match the floor plan! The front wall in the narrow hallway used to be about 4″ to the other side of what is now the shower entry (what used to be the bathroom door). It was a long stumble from my bedroom in the middle of the night to that door to use the facilities.
My original plan was to wrap three of the studs in the shower wall with tile, then run glass between them, to allow more natural light into the shower from the bathroom window (there’s an overhead combination light/fan/heat lamp in there, too). But as I took a hard look at the space and my budget on Friday, I changed my mind. That plan would mean a heck of a lot more work for me to deal with the ceiling and floor transitions, and to wrap those studs with drywall. Plus there would be the added expense of the fussy tile work (with copious cuts) and the glass panel installation (as a full-time editing/woodworking hobo, I now have to watch my pennies a bit more closely…not that being a magazine editor was lucrative, you understand, but it was a steady income). Also – and perhaps most mind-swaying – I built a shower with two glass walls at my last house; it was a bitch to keep clean.
So for a number of reasons, I decided to do boring – but easier and far less expensive – flat walls there instead.
But I’d bought only enough drywall for the original plan, and because drywall panels don’t fit in my car, I had to dragoon Christopher Schwarz and his truck to pick it up (as always and for everything, thank you, Chris.)
So I ran out of drywall panels.
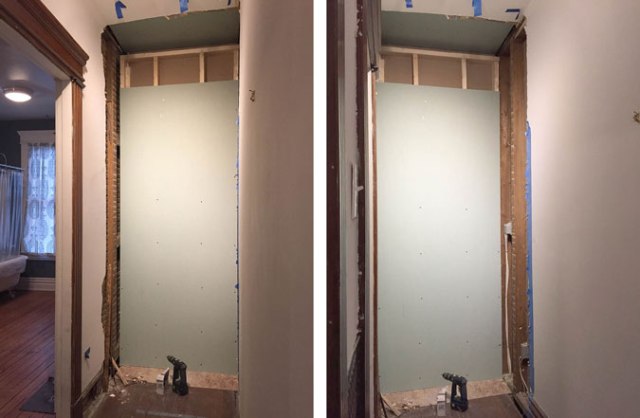
Deconstructionist. The left-side (left, natch) and right-side views. Note the difference in ceiling levels – there are three (!!) layers of ceiling panels of some kind or another over the original lath and plaster, so what I took down resulted in a good 3″ differential from what I didn’t. But I just don’t have it in me to take down/redo the ceilings throughout.
That lack will in no way affect the shower finishing (whew!), but it looks terrible. I can live with “looks terrible” for a long time…perhaps that’s obvious if you’re a regular reader (I started swinging the sledgehammer on this project on November 9, 2016).
But I’m making a built-in Arts & Crafts-inspired linen cupboard for that space anyway (yay – some actual woodworking!) … so does it really need to have finished walls behind it? I’m going with no. That will give some future owner something to bitch about it when they tear out everything to turn it back into a two-family.

Gap at ceiling easily covered by crown and the 45%-cut-2×4 backer for the crown?
There’s no crown anywhere else in the house…so I’m afraid it would be too obvious I’m trying to hide something (plus I think it would look odd so close to the top of the window…but I _really_ don’t want to tear out the ceiling to raise it back up 3-1/2″ to it’s original height). I’m thinking “No-Coat 450 Flexible Corner,” or something like.
Treat it like just a big patch? With Bondo (like the guy in https://www.youtube.com/watch?v=BHPXFtnvAD8), or a add a furring strip or some mesh and spackle/drywall compund over it or….
This is a good product, mix up small amounts, under-fill the gap, working to close to the finish level and then use a longer setting joint compound. https://www.homedepot.com/p/SHEETROCK-Brand-Easy-Sand-5-Lightweight-18-lb-Setting-Type-Joint-Compound-384150060/202329628?MERCH=REC-_-PIPHorizontal2_rr-_-100321609-_-202329628-_-N
Megan,
the site engineer in me cries „sound insulation“ – I‘d say get some more panels and finish the layer and the gap? Drywall panels don’t fit in my car too so I‘ve been known to cut them to rough size in the parking lot… trust me, it’s fun!
Hmmm. I live by myself, so interior sound insulation didn’t occur to me – but that’s a good consideration.