
 Carcases: seven per corner; lower skirts: three per corner; upper skirts: two per corner; dust seal: one at each end. That’s 50, right? Multiply that times six students, plus me, and that’s…a total of 340 (I didn’t manage to get to my upper skirt and dust deal) dovetails cut in the last five days in my “Anarchist’s Tool Chest” class at the Lost Art Press shop.
All the guys did a fantastic job, and left with six great-looking chests. I promised them a roundup of what comes next (beyond what’s in Christopher Schwarz’s book), so here it is, with links to resources. Figured I might as well post it as email it.
The glue wasn’t quite dry enough on the dust seals (and the road was calling), so I sent everyone home with a handful of 6d Tremont fine finish nails, and instructions to drill pilot holes (3/32″) and put five nails across the front and three on each side, then use a nail set to sink them slightly below the surface. Belt and suspenders. (To attach the bottom boards, we used Rivierre diamond-head nails, available in the U.S. from Lie-Nielsen Toolworks and Lee Valley Tools.)
With that done, it’s on to making it functional for more than blanket storage.
Innards
How Christopher Schwarz does it now (a bit different than what’s in his book):
https://blog.lostartpress.com/2018/03/31/tool-chest-updates-the-innards/
https://blog.lostartpress.com/2018/04/23/tool-chest-changes-to-the-sawtill/
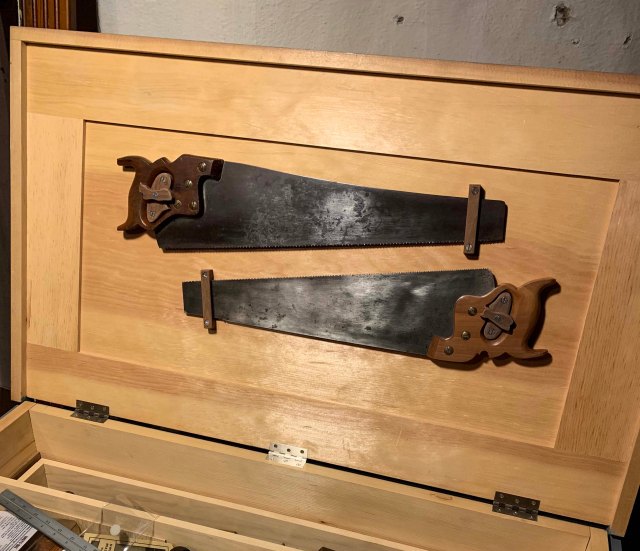
What mine at home looks like, with panel saws in the lid…
…and backsaws hanging behind the 7/8″-thick x 1-1/8-wide tool rack (the saw slot spacers are 5/8″ thick and 2″ wide; the front wall of the slot rack is 3/8″ thick x 2″ wide):

The tool rack and slot rack, empty

The tool rack and slot rack (and tills) with saws and tools therein.
You might notice in the photo above that not only do my drawer-bottom species not match (I used what I had), but that the drawer sides (the middle one, in particular) are slightly shy of the chest walls – only the nailed-on drawer bottoms extend to the runners. They’re easier to fit that way.
Lifts & Hardware
Wooden lifts:
https://blog.lostartpress.com/2018/04/26/tool-chest-dog-bone-lifts/
Beckets:
Rope handles – I’ve not used them on anything, but sure they look nifty:
http://www.marlinespike.com/beckets.html
Iron lifts:
Check out eBay and other auction sites for beefy vintage ones, or go custom with your friendly blacksmith (those on my home chest were designed by Janet Switzer, and made by John Switzer at Black Bear Forge).

For my new chest (which will live at the Lost Art Press shop), I’m hoping to commission iron lifts that are sleeping, curled-up cats, with the tail serving as the handle part – or better yet, an appropriately tweaked version of my Rude Mechanicals Press logo, with the tail as the handle.
Hinges, lock and drawer pulls:
Horton Brasses offers the hardware kit as seen in “The Anarchist’s Tool Chest”; it includes hinges, drawer pulls and a lock. But for my home chest, I ordered the hinges and pulls separate from the kit so I could get a nickel finish. Because…OOOOOO shiny. (And as you can see above, I’ve yet to install a lock – but the blue tape marking the area for it is holding strong!
You might also consider a crab lock – one from Peter Ross, perhaps. Or the manufactured version offered by Whitechapel if you’re a bit budgetarily constrained. (Peter also makes gorgeous chest hinges – as might your local blacksmith.)
Paint
If you have any divots or minor gaps you’d like to hide before you paint, fill them, let the product dry, then sand to level the surface. I prefer Durham’s Rock Hard Water Putty for this, but Bondo is another classic choice.
No matter what paint you use, you’ll almost certainly have to lightly sand after the first coat raises the grain – or raise the grain beforehand by misting with water, then sanding.
I like traditional milk paint – even though the first coat might make you cry. After several coats, it looks great (allowing the wood grain to show through) and wears well. I think on the new chest, I’ll use “Dragonfly” from the Real Milk Paint Company. Mike Dunbar’s article on milk paint is useful, as is this post from Peter Galbert. General Finishes makes a faux milk paint that’s easier to use and looks pretty good, though it obscures the grain. And there’s always latex. The inside gets either no finish, or a coat of shellac (if you must).

Should they clench the nails on the bottom of the dust seal? I’m builiding a 6 board chest right now and I’m trying to figure out if I should do that. I’m leaning toward “yes” but I’m also a long distance from worrying about the dust seal right now.
On the 6-board, if there are battens on the lid, those are typically clinched/clenched. But on the ATC, nothing is. The nails go through the seal and get buried in the lid. (And those are suspenders, supplementing the holding power of the belt (glue).
Makes sense. Thanks!
I would add exterior flat house paint to list of possible finishes. The price is generally acceptable, especially if you can get away with just buying the sample size. Color range is pretty near infinite.