
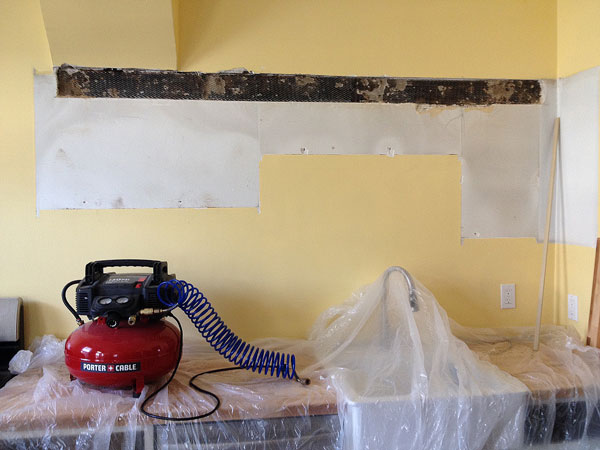
I decided some time back that, despite my original plan, I didn’t want cabinets over the sink. Once I removed the old ones (only to reveal yet another an unexpected repair project), I liked the open feeling and how much larger the kitchen seemed. Plus, I already had a lot more storage in place. (And perhaps – just perhaps – I was tired of making plywood boxes.)
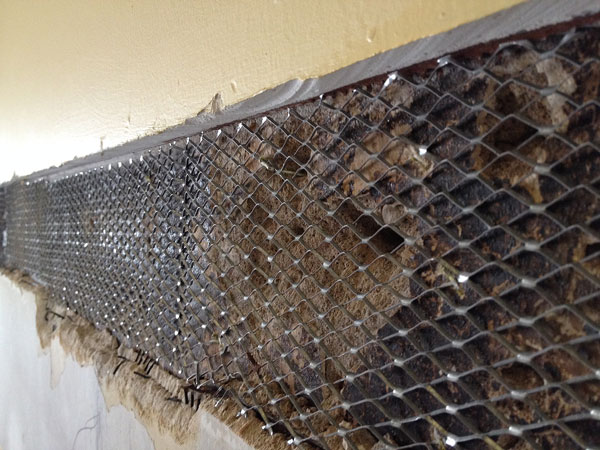 So after stapling up some wire mesh, I mixed up some plaster and sand for a first coat, because that dries a great deal more quickly than straight-up plaster. After slapping the stuff into the bulk of the patch, I went back over it to make sure I inset the sand/plaster mix below the finished face of the wall; were it to protrude or be even with the surrounding surface, the sand would make the topcoat more difficult to get smooth. So I erred on the side of caution; it was actually two coats of straight-up plaster to get the patch smooth, looking good and flush with the existing wall. Then, I primed and painted.
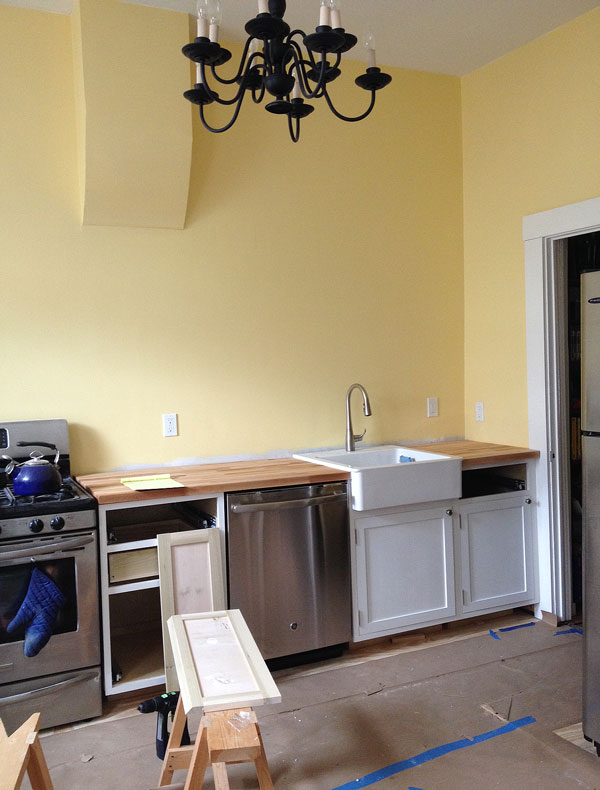
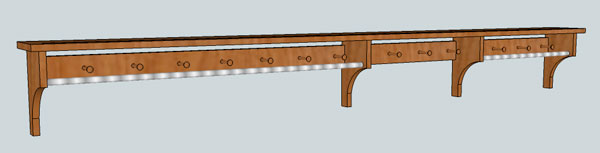
But that’s a whole lot of yellow in a whole lot of what looks like wasted space. So here’s the plan: A Shaker-inspired peg/pot rack that runs just below that pesky chimney bump-out from the stove edge of the counter to the wall. I’m thinking maple with a natural finish, with a 3/4″-diameter stainless steel rod between the left counter edge and the sink, and picks up again for the short run from the sink to the wall. (Seems like a bad idea to hang heavy things over a porcelain sink…and anywhere, that’s where the clock goes.)
On it, I’ll hang just a few pots – more decorative than necessary, really. I now have all but one drawer finished, and more than enough storage space.
But I’ve some concern that the rack will cut the room in half…as did the old cabinets. So I might run a simple peg rail up above it just to break up the area (whether it’s with or without a shelf remains to be seen), then hang another one next to the back door for visual balance in the room. And for coats, natch.
Here’s my quick sketch. While the other components and design are subject to change, the stainless is a definite; it was delivered today.

You could make a quick cardboard and hot glue mockup and try it out first to see what it looks like.
I really should. But _something_ has to go there…and this is an easy fix (as long as I can find someone to cut the stainless, of course…)
What about cutting a groove into the top ‘shelf’ part, adding a lip at the front, and using it as a plate rack for decorative items? Or put another ‘shelf’ above it, with similar bracket/corbel design and a groove/lip at the front? Then you will have ‘something’ above that great horizontal divide.
Oh right – there’s a groove in my sketch – you just can’t see it. And yes, I was thinking something along those lines above the pot rack version (but only to the right of the bump-out…still hoping to be able to afford a stove hood on the other side)
Which bourbon goes best when plastering?
?
Whatever is closest, really.
I did nearly the same several years ago, but only the shelf. I keep a number of dry goods canisters and an old cookie jar of utensils on the shelf. I have never missed the cabinets and enjoy how much larger the kitchen feels. I then built the Shaker chimney cupboard from PWW for storage of plates, glasses, etc.
What’s your Realtor think? I ask because you are fixing this up to sell, correct?
It is realtor-approved. Though I think he just wants me to finish…and this is faster than more cabinets 😉
Definitely faster. I like Jonathan’s idea of a mock up. You could play with how multiple shelves will look . Multiple selves will handle the ” cut the room in half” problem. By the way, you did a nice job on the plaster repair. In the pic it is invisible.
Thank you. I’ve had far too much practice, really.