

I ran out of room on my sawbenches – ladder to the rescue!
After a summer filled with travel, teaching, fun and family visits (and the day job, of course), I’ve finally the time to get back to work on the guest bathroom. I vow it will be completely done by November 9 – one year to the day I picked up my sledge hammer and started swinging at the walls.
Today, I sanded down the raised grain and fuzzy patches left by dip-stripping the original trim I’d unearthed in the garage, then I got out the paint and brush. Why, you might ask, did I bother to have it stripped just to again paint it? There were enough layers of (probably lead-based) paint to obscure the details. Plus, I figured the chemicals would kill any wee beasties hiding inside.
At work, I’ve already moulded (by router) the ogee edges of the two stools (the decorative piece that goes atop the sill to butt up to the window’s lower rail); this week, I’ll pull out the moulding planes to replicate the fairly fancy trim that wraps the top of the aprons (the bit that goes under the stool) to match those in the rest of the house, and to shape the aprons’ bottom edges. (Easier, cheaper and more efficient to use the hand tools I already have than to try to find (and buy) the necessary router bits.)

Replicating this will be a bit of a challenge.
Before I can install the trim, however, I have to get creative to overcome some remuddling. The bathroom walls have 1/8″ drywall (yes – 1/8″; no wonder the walls are curvaceous) over the plaster, and it stops a couple inches short of the window casing. As a result, the wall protrudes 1/8″ farther than the casing to which the trim must be nailed. That will cause problems a) with the trim sitting level to the wall, and b) with properly installing the window stops (oh yeah…gotta make those, too). So, I have to run about 37′ of 1/8″ x 2″ (or so) of something to install flush to the casing before I can install the trim. And I’ll have to scrape the casing first, to boot.
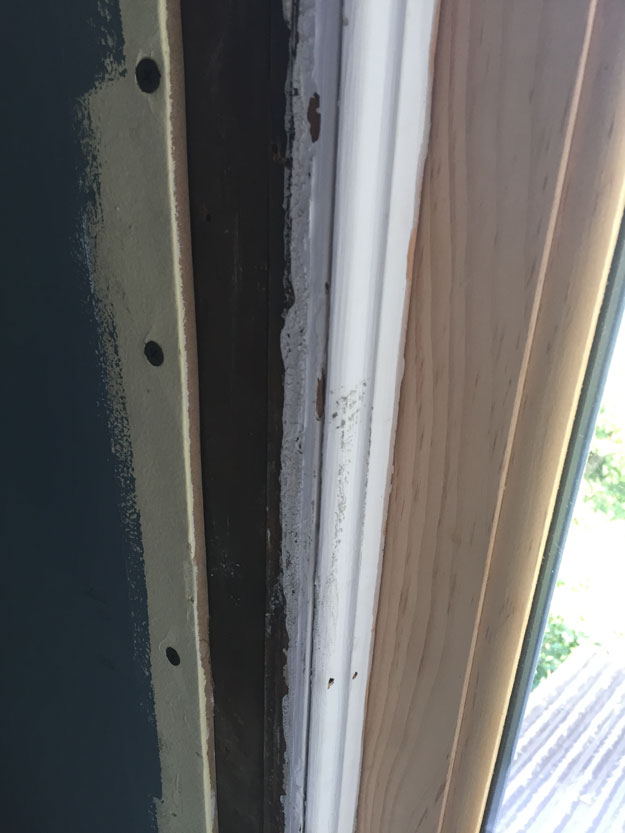
How very vexing. (Those are, BTW, temporary stops)
The biggest challenge by far, though (with the plumbing now out of the way) will be the base moulding. It’s an 8-1/2″-wide multi-part undulating design that’s going to be a pain in the keister to make – so once I decide how I’m going to do it and get the tooling dialed in, I’ll run scores extra feet thereof for places in the house where it’s missing, and for the kitchen remodel to come. (After a year of haunting architectural salvage stores and sites, it has become painfully clear the only way forward is to sneck up and make it.)

Replicating this will be more than a bit of a challenge. Also, I need a new vacuum cleaner…and someone to run it.
But tomorrow, my plumber is coming to put in the sink shut-off valves and drain – so I’ll finally, after one year, once again have a full suite of working bathroom fixtures in one room! Plus, he’s going to install the mixing valve and run the pipe beyond it for the shower head in my walk-in shower – so I’ll finally be able to move forward with that project as well!
And by now the first coat of paint is probably dry. Time for coat two.

Hi Megan! I recently ran into similar issues with drywall and other materials not quite lining up with door and window casings. What I did was routed an 1/8″ or however deep relief in the back of the trim piece. I am not sure if this is a viable solution for you, but it saved me from having to build anything out in order to make it look right. Good Luck!
Glad you are closing in on it.
Good on you Megan. I think I’ve mentioned it before but I wonder if Hyde Park Lumber has something close you can modify for any of the mouldings. Justin’s suggestion on the 1/8″ drywall makes sense as well assuming it meets your needs. Looking forward to the next update.
HPL has nothing close – I checked! BUT Art Woodworking, just down the street from me (I’ve posted pictures of their massive knife collection on IG) might have the right cutters (they’ve been providing custom trimwork etc for 90 years). The only holdup on finding out is my being able to go there when it’s open!
Cool! Good luck. That would save lots of time depending on how many feet you need to run.
Ummm… Looks an awful lot like WM – 8416 base cap to me…
Sadly, to me it doesn’t look much like it at all.