Put the Nail(s) in the Coffin

ClassPicI am dead tired…from building coffins (so at least I’m prepared). This weekend, I had six students in a coffin-making class at Lost Art Press. The project itself was a Halloween conceit; really, it was a class in sawing. Lots of sawing – both crosscuts and long rips.

Typically for two-day classes, I’ll prep the wood to finished size (or darn close to it); the class is on the joinery that holds the pieces together, and smoothing the work for a finish.

Bottom

The bottom panel, after crosscutting to length and ripping to shape (here, Matt is planing down to his line). The breastline (the widest point) should match your shoulder width plus an inch. The height is your own plus 2″.

For the coffin class, that wasn’t possible – each is fitted to its maker. Had I gotten everyone’s measurements beforehand and cut the pieces to shape and size, it would have been a three-hour class: one hour for planing, one hour to kerf then bend (with a hot-water assist) the sides and one hour of nailing (we used a lot of nails).

Assembled

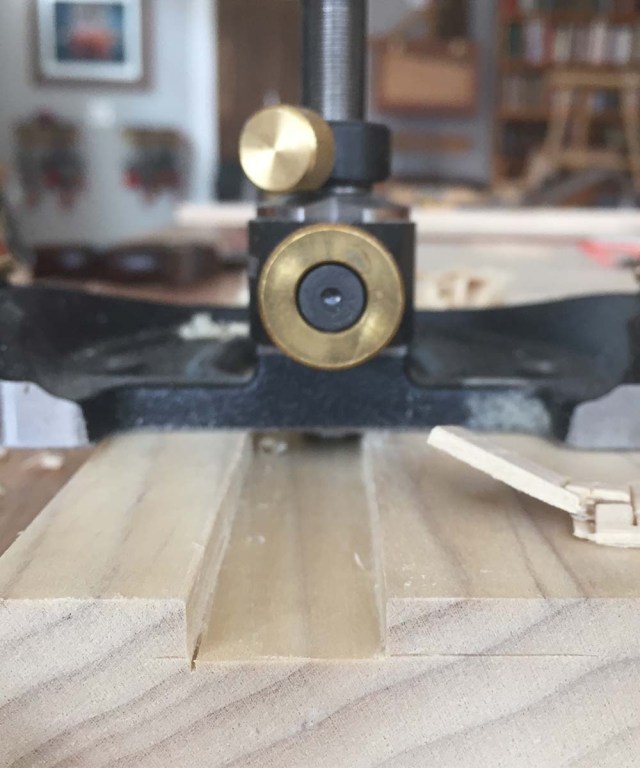
We planed 6° angles on the top and bottom edges of the bottom, then nailed the headboard and footboards in place. Here, you can see the kerf cuts that allow the sides to bend. After cutting those (typically five – one where the sides meet the breastline, then two to either side), the long edges are nailed to the footboard and bottom, up to just below the bend.

Instead, on every student’s bench was an oversized bottom, sides and top panel (with headboard and footboards cut to size). They crosscut and ripped those to fit, then cleaned up down to their cut lines with handplanes. The two sides were match-planed (sandwiched together and planed) to taper top to bottom.

Then, we cut kerfs at the bends in the sides, nailed the long edges, and put the kettle on. Out back in the “biergarten” (also the spray booth), we poured steaming water down the kerfs, let that sit for a minute or three, then worked with a buddy to bend the side down to meet the headboard, while the maker nailed it in place to secure the bend. (Flip and repeat).
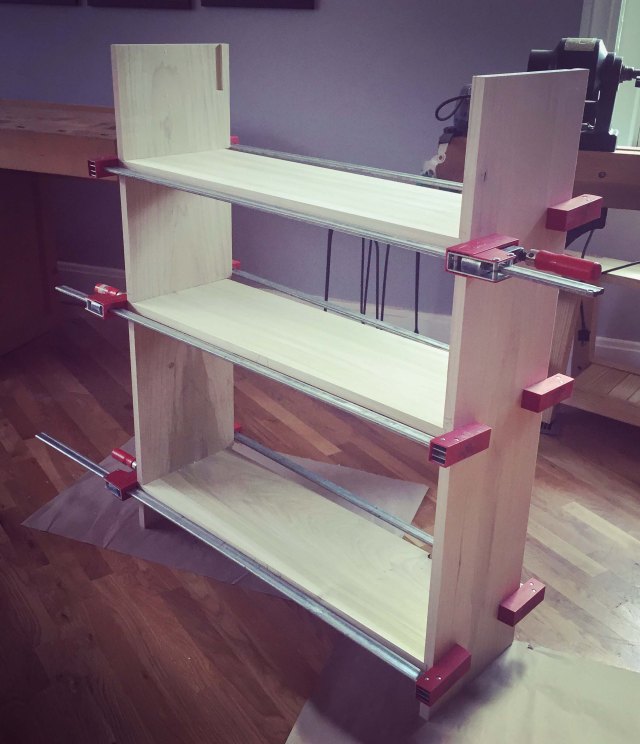
pallbearers

After the bends.

The last task on the boxes was to flush the overlong sides to the footboards and headboards. Then, flip the box upside down on the interior of the lid, trace the shape…then saw some more – whee!

It was demanding work – but lots of fun. And the looks from passersby? Priceless.

Everyone did a great job – and I hope they had a great time; I know I did!

For step-by-step instructions on how to build your own coffin in this, the “Southern Counties” style, see “The Anarchist’s Design Book,”  by Christopher Schwarz (or look for this class next year…sometime just prior to Halloween); for more on building a variety of coffins, see “Coffin-Making and Undertaking,” edited by Paul Hasluck. (My favorite lines from that book: “The polishing (finishing) of a coffin is often left alone by undertakers, under the impression that it cannot be done properly except by an experienced polisher. This is perfectly true as regards polishing in general, but in a coffin the lasting quality of the polish is immaterial. If a good polish to last a few days is obtained, it is enough….” (He then goes on the tell the reader how to fill the wood pores and apply a French polish. Good enough indeed!)

Posted in Classes, Woodworking | 5 Comments

Grave Undertaking

glueups
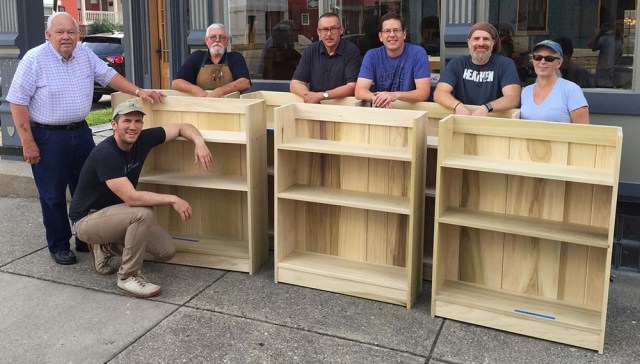
This weekend, I’m teaching a coffin-making class – and those who choose to will re-purpose their pine boxes as bookcases until they’re needed for their intended purpose. (Mine is going on my front porch until Nov. 1; then I’ll add shelves.)

I thought it would be fun to do these just in time for Halloween, but I made a grave mistake by putting off prep until today.  I was thinking of prep in terms of my measurements. Assuming I don’t gain a lot of weight between now and my end, I can fit inside a 2-board bottom and top, and single-board sides (1x12s). But I am 5’6″ (or at least I was at age 30) and not terribly muscular (or on the particularly heavy side); all of the students in this class are men, and thus likely larger in all dimensions.

So I’m basing the rough lengths off Christopher Schwarz’s height (he is (was?) 6’3-5/8″) and the rough widths of someone slightly less than William Howard Taft’s approximate girth (in 1928…not now; he’s probably lost a lot of weight in the last 90 years). That should account for a range of shapes and sizes. But that means 28 panel glue-ups, some of them three boards wide. Turns out, one can get blisters from clamps – but that won’t kill me. And if it does, well, mine are the shorter and narrower pieces – just build it around me.

Posted in Classes, Woodworking | 8 Comments

A Place to Put my Stuff

IMG_0385 copy

After finally “finishing” the worst drywall patching in the history of drywall patching, I’m ready to start on the built-in closet that will cover up my shoddy patch job and make use of this dead-end hallway on the backside of my shower by providing linen storage. (Right now, my extra sheets and towels are in inconvenient plastic tubs under my bed.)

I perhaps ought to be more ashamed of my drywall work…but I wasn’t planning on putting up any in this space; what’s here is simply what was left over from the bathroom. And I’m not bothering to tape or mud it; it will be completely covered, top to bottom and side to side.

The built-in will basically be two big plywood boxes, with a face frame out of reclaimed Southern yellow pine to match the rest of the trim in the house. The bottom cabinet will have three drawers; the top will have two doors with a center fixed shelf, and three adjustable shelves. In between (on reader recommendations from an earlier post), I’ve decided on a pull-out shelf for folding towels or what have you. (I first drew a drop-down front, but didn’t like the look of the supporting lopers.)

Screen Shot 2018-10-09 at 8.53.36 PM

Side, back and top removed.

The wide rail at the top will get an applied casing and mouldings just like those atop all my door frames, flush to the ceiling (I’ve had a salvage one, er, seasoning in the basement for a year now…).

I have the SYP for the face frame and door rails and stiles – and best of all (if I can make the frames without mucking it up), it already has a perfect patinated period finish. I’m  hoping to find the same for the drawer fronts and door panels – or at least SYP from the right period. (I have a matching finish formula worked out…but wouldn’t it be glorious to not have to use it!)

In the meantime, I have some big-ass boxes to build and lots of plywood to waste.

Screen Shot 2018-10-09 at 9.31.21 PM

Sub-optimal “optimization.”

Posted in Baths, Renovation/Restoration | 7 Comments

Jan.-June 2019 Classes at Lost Art Press

Just in case there’s anyone who follows me who doesn’t also follow the Lost Art Press blog (which seems unlikely…).

Posted in Classes, Woodworking | Leave a comment

Reader, I Did It

IMG_0305 copy

I’m headed back to Building Value on Monday morning to take apart then transport these columns and knee walls to my foyer…where they will no doubt sit for a little while before I get around to installing them.

I decided I couldn’t pass on this salvage unit – especially after I talked the manager down a bit in price – even though it’s not a perfect fit.  The column and base assemblies are about 16″ too short, and the unit as it stands now is about 40″ too narrow, so I’ll be removing the frame around the unit, and attaching the knee walls and columns directly to the walls. Plus, I’ll build up the base for the knee walls to a height suitable for bookcases – which is what I wanted to begin with – using some of that frame. I’ll also remove the frame-and-panel assembly from one face of the current knee wall, then use it as the back (or front, depending on which side you stand) of the new base portion.

That rest of that 10″-wide old-growth Southern yellow pine frame will be repurposed as the face frame for the (still to be built) built-in linen closet in my upstairs hallway – the finish (and the wood) matches all the other woodwork in my house.

And if there’s any left after the above, I’ll no doubt find a use for it.

Arguably, as a self-employed hobo, I should have just let it go…but I know I’d regret it for years to come (those columns are in darn-near perfect condition!). And I recently finished a delightful and unexpected assignment that helped to cover the cost. Unbudgeted income (plus a little more) for an unbudgeted expenditure – a fair trade.

Chris, I hope you don’t mind that I’m borrowing your truck (I only wish I could borrow you on Monday, too – bet you’re glad to be out of the country)!

Posted in Foyer, Renovation/Restoration | 11 Comments

2019 Woodworking Classes

IMG_0140 copyOn October 8, we’ll be releasing the list of January through June 2019 woodworking classes at Lost Art Press, for which registration will be live at 10 a.m. EDT on October 12. But I’m waiting on a few class descriptions from visiting instructors, so it’s possible there will be a few more first half of 2019 classes announced a bit later this year. I don’t want mine to be among those stragglers, so I’m finishing up my descriptions today.

I do this coming off a hard-working weekend of Dutch tool chest building…in which we got soveryclosetodone, but to get there, we had to work late on Saturday, and on Sunday, Christopher Schwarz and I sped things along by using the machinery for some of the operations. That way,  everyone could leave with an almost-finished chest (they’ll be attaching the lifts and lids at home). And the same thing happened earlier this year. Two days is just not enough time.

So for 2019, I’m changing the Dutch tool chest class to a three-day event ($450 plus materials). That will provide ample time for all the intended operations to be performed by hand, I won’t have to get out the whip, and we’ll get the lids attached. And because I am a glutton for lots of wood prep, I’ll be teaching it three* times: February 22-24; June 14-16; November 15-17.

I’ll also be teaching: Shaker Hanging Cabinet, Boarded Bookcase, 6-board Chest, and two week-long classes in a full-size English tool chest – a.k.a. “the Anarchist’s Tool Chest.”

Check the Lost Art Press blog (and here) on October 8 for details on my classes, plus classes from Brendan Gaffney, Christopher Schwarz and a handful of visiting woodworking luminaries.

* I’ll also be teaching a week-long class in the Dutch tool chest June 24-28 at the Port Townsend School of Woodworking; that fancier version will have a lid with breadboard ends, plus we’ll have time to properly outfit and customize the interiors (the description will soon be up on the school’s site).

Posted in Classes, Woodworking | 8 Comments

Video: Peter Follansbee Riving Oak Boards

PFIn the midst of cleaning out my virtual files, I came across the video below of Peter Follansbee showing how to rive boards out of oak . It’s 114.7 MB for which I don’t have room on my computer, so I’m sharing it here.

I shot it during a 2011 class with Peter on making a joint stool from a tree…coincidentally the title of a Lost Art Press book co-authored by Peter and Jennie Alexander.

Peter is just about done with his initial work on another book, tentatively titled “Joiner’s Work,” on making joined and carved chests (and I’m just about done with its initial edit) – so look for that soonish, likely early 2019, from Lost Art Press.

Posted in Woodworking | 2 Comments

Astragal, Beads, Torus, Ovolo & Cavetto

mouldingsAn astragal is a moulding of a semi-circular profile; its construction is so simple that it would be unnecessary to say any thing concerning it. Fig. 1.

There are two kinds of beads, one is called a cocked bead, when it projects beyond the surface to which it is attached, see Fig. 2; and the other is called a sunk bead, when the sinking is depressed beneath the surface of the material to which it is at­tached, that is, when the most prominent part of the bead is in the same surface with that of the material, Fig. 3.

A torus in architecture is a moulding of the same profile as a bead; the only difference is, when the two are combined in the same piece of work, the torus is of greater magnitude, as Fig. 4; in Joinery the torus is always accompanied with a fillet. Fig. 5. single torus moulding.

The Roman ovolo or quarter round, as called by joiners, is the quadrant of a circle, Fig. 6. When the projection and height are unequal, as in Fig. 7, take the height B C, and from the point B describe an arc at C, and with the same radius from A, describe another arc cutting the former at D, with the distance A D or D B describe the profile A B. This is generally accompanied with fillets above and below, as in Fig. 7.

The cavetto is a concave moulding, the regular profile of which is the quadrant of a circle, Fig. 8; its description is the same as the ovolo.

Check back for Figs. 9-12, the scotia, ogee, cima-recta cima-reversa

From Peter Nicholson’s “Mechanic’s Companion

Posted in Books/Editing/Writing, Rude Mechanicals Press | 2 Comments

Bookcase Catch-Up

bookcase

Paul, Neil, Laurence, Bob, Jon, Ethan and me (from l).

Last weekend, I helped to birth six new boarded bookcases (based on Christopher Schwarz’s plans in “The Anarchist’s Design Book“); I, however, am still in labor. Whenever I teach, I prep wood for a build of my own, but I have yet to finish a project in class.

I have in my basement and the back of my car at least five Shaker silverware trays with two of the dovetailed corners fully cut and fit, and the third and fourth corners begun. I have three Dutch tool chests, all with the shelf dados cut and the dovetailed carcases glued up. I have a Shaker stepstool with one dovetailed sided fully cut and fit (including the back rail and step rails…on just one side). And I have goodness knows how many other half-built projects from classes kicking around.

I get started along with students, using my own pieces to demonstrate each step, then I leave them to it as I walk around to lend a hand or suggestion as needed. I almost never manage to get back to my own project (and I typically lend out my tools, which makes it difficult to work).

The bookcase, however, I am determined to finish. We need another one in the shop, and there’s no more room in my car for another half-built thing (especially one this large).

So after taking the day off yesterday to sleep in and be lazy (and do some editing on the computer), today I popped over the river to finish the dados and grooves on my second side.

IMG_9864 copy

Groove for the back rail. And oops – a wee overcut on the left wall.

I have the case in clamps now with the glue drying. Tomorrow, I’ll drill pilots and drive the nails, then process enough lumber for my backboards (because I either underestimated how much wood I needed for seven bookcases, or I was shorted a bit). I think I’ll go with a tongue-and-groove back – the no. 48 plane is just too much fun to not use.

mycase

My next class is another Dutch Tool Chest (Sept. 22). Perhaps I’ll be savvy enough to bring in one of the half-done ones on which to work. Sure, I’ll have to start a new one to demonstrate the joinery, but maybe while the class is cutting those dovetails, I can get ahead on the last one and be three-quarters done.

Just a heads up: We’ll be announcing some early 2019 classes at the not-a-school at Lost Art Press in October.

Posted in Classes, Woodworking | 7 Comments

Iron & Fire

Plate33.2400

Sure, I love “Mechanic’s Companion” for the Carpentry, Woodworking and Turning sections. But Peter Nicholson also covers the early 1800s tools and trades of many of the other skills that go into making a building: Bricklaying, Masonry, Slating, Plastering and Smithing.

I’ll likely never build a forge – but I do love good, hand-forged ironwork (would that I could afford it for all my hardware needs!), and the plates in the Smithing section are lovely (one is shown above).

Below is the introduction, and description of the forge.

SMITHING is the art of uniting several lumps of iron into one mass, and of forming any lump or mass of iron into any intended [shape].
§1. Description of the Forge. PL. 33.
The forge consists of a brick hearth raised about two feet six inches, or sometimes two feet nine inches from the floor; heavier work requires a lower forge than lighter work: its breadth must also depend upon the nature of the work ; the brick work may be built hollow below for the purpose of putting things out of the way. The back of the forge is carried up to the top of the roof, and is enclosed over the fire in the form of a funnel to collect and dis­charge the smoke into the flue, the funnel is very wide at its commencement, but decreases rapidly to the flue, whence it is carried up of a proper size to take off the smoke. The wide part is called the hood or hovel, which in modern forges, particularly in London, is constructed of iron. The air drawn in by the bellows is communicated to the fire by means of a taper pipe, the small end of which passes through the back of the forge, and is fixed into a strong iron plate, called a tue.iron or patent back, in order to preserve the bellows and the back of the forge from the injuries of the fire. A trough for coals and another for water are placed on one side of the forge, generally extending the whole breadth. See the Plate.

The best position of the bellows is on a level with the fire-place, but they are frequently placed higher for the purpose of getting room below.

The tools follow.

“Mechanic’s Companion is available direct from my hallway (warehouse) and dining room (shipping department), and from a handful of select woodworking specialty stores, both domestic and international.

IMG_9762

Posted in Books/Editing/Writing, Rude Mechanicals Press | 3 Comments