Please Excuse the Dust

fridgerun

After 100+ years, the floors in my house have settled to a series of gentle (and a few not-so-gentle) undulations. So when I built and installed the kitchen cabinets, I set each on a separate base to make it easier to level the run. It still wasn’t easy; one base had a 1/2″ differential from side to side.

The time has now come to cover up my “cheat” with a proper-looking toe kick. While the construction will be a snap (3/4″ poplar with mitered corners, simply nailed to the plywood bases), I can’t decide if it should be black or white – and I have to paint before the install.

toekicksI’m leaning toward black, not only to match the bases of the refrigerator, stove and dishwasher, but to better blend with the dust and cat hair that inevitably collects beneath the cabinets.

But I wonder if a dark band will pull the eye down too much…thereby drawing more notice to said dust.

All but one of the many images in my “inspiration kitchens” folder, however, show a white toe kick when the base cabinets – like mine – don’t feature furniture-style feet. All of the many images in my “inspiration kitchens” folder, however, look as if they’re from from houses where there might well be live-in help with the cleaning.

So: Black or white? If you have white kitchen cabinets (and like me clean your floors no more than twice a month), do me a favor and take a look at your baseboards. Then let me know what you think.

Posted in Kitchen, Renovation/Restoration | 32 Comments

In Which Megan Narrowly Avoids Death by Cabinetry

hall-cabinetRaney Nelson was at my house a month or so ago, and mentioned that, while the kitchen looked nice, I could use more storage. I’m loathe to admit it, but he was right. I had no good place to hide a box of kitty litter, extra paper towels, tertiary pots and pans, and the like.

So today, I built what I swear on a stack of Shakespeares is the last kitchen cabinet – though it’s not technically in the kitchen; it’s in the tiny hall that leads to it from the living room. (Perfect – the litter box is in the half-bath off that hallway…I had to stand in it to take the picture.)

Hauling home from the shop a 35″-wide, 85″-tall cabinet in a Subaru is stupid. I had the driver’s seat pulled all the way forward and sat legs akimbo with my knees jammed into the dashboard, the top of the cabinet basically resting on my shoulder blades. I had to use bungee cords to keep the hatch closed. (And have I mentioned I drive a manual shift?) Had I been hit from behind, I’d have been decapitated by a cabinet. It would have be an undignified death indeed. (I do have bruises on both shoulders from a too-sudden stop, but there’s been no bloodletting.)

So now I have plenty of storage (the center shelf is fixed, the rest are adjustable). But there’s still a face frame and double doors to make – and won’t that be fun! Notice the uneven gap down the left side? The cabinet is straight, level and square. The wall (actually, it’s ductwork there to the left) is not, nor is the door frame to which I’ll need to scribe a wide face frame. There’s a 5/8″ differential between the widest and narrowest points…not that they’re points in a straight line, mind you – it’s more of a gentle wave pattern. But if I can get the face frame scribed and installed correctly, that will (obviously) make fitting the doors a far simpler process.

overfridgeOh – and there are two doors still to make for the cabinet I made last weekend…which I vowed, as I installed it, was the last kitchen cabinet.

I guess technically it was.

So no more cabinets – if for no other reason than I’m finally out of the eight sheets of 3/4″ plywood I had delivered lo these many months ago. And no matter how idiotic the driving risks I’m willing to take, a 4’x8′ sheet simply will not fit in my car. But that’s a problem; I need one last sheet of 1/4″ for the doors. Maybe it will bend enough…

Posted in Kitchen, Renovation/Restoration | 24 Comments

As Long as I Don’t Answer Back…

MFwood

I was in the shop last weekend surfacing lumber for the Roubo bench-style kitchen island I planned (lo these many months ago). But as I was surfacing the walnut, it started talking to me. It whispered “Please don’t rip then reglue me into a thick benchtop. I’m too pretty.”

MF1

OK. I’m listening. But now it’s back to the drawing board. Or really, to the sketchbook (napkins) then to SketchUp.

So now, thanks in part to a couple comments resulting from my chalk drawings posted on the PWM blog, I’m thinking of something inspired by a library table. I still have strict requirements for this piece: counter height, hold a microwave on a shelf underneath the top, no wider than about 22″, no longer than about 52″, has to clear an air vent, must have  room at the end for two stools…and four knees. But a thinner top will bring the microwave shelf a few inches higher, and, because it will weigh significantly less, I won’t have as much concern about tippiness* at the end where the stools (and knees) will go.

I’ve spent some time over the last couple days poring over Internet images. Below, I’ve posted three inspirations pieces that I’ll use as a (re)starting point. (The first two are unattributed pieces; the last is by Frank Lloyd Wright.)

Time to sharpen my pencils. I have to get this thing (re)designed and built…so I can move onto the next thing. (I’m tired of thinking about islands that involve no beaches or umbrella drinks.) More to come…and soon.

Screen Shot 2014-10-09 at 9.51.20 PM

Screen Shot 2014-10-09 at 9.50.36 PM

Screen Shot 2014-10-09 at 9.51.44 PM

*Fun with neologisms.

Posted in Woodworking | 16 Comments

‘Once More into the Beech’

Screen Shot 2014-08-14 at 9.09.55 PM

Four years ago, we received at PopWood a couple review copies of “500 Cabinets” (Lark) in which were pictured…500 cabinets. The book was (and still is, one presumes) chock-full of interesting and creative casework, much of it modern. And for some reason, a lot of modern furniture gets what I think are amusing and confusing (and often-times pretentious) names. Christopher Schwarz wrote a much funnier post about it than can I – so click here to read it; I’ll wait.

For the next issue of the magazine, I’ve attempted a nod toward modernity (though the Shaker influence is clear) – a hanging cabinet with contrasting woods (walnut and spalted beech, from a beech buy that’s shown up in several other PW articles in the last decade) and a live-edge top that has a void at one end.

This thing needs a pretentious name. My suggestion is the headline above – though I also like “Travaille Épuisant en Noyer.”

I’m showing it to you here in black and white with a fuzz filter…because that seems more pretentious. And also because I don’t want to give it all away on our first date; you’ll have to pay $5.99 first.

Please offer your suggestions below. (Chris likes “Follies of Pumping Equipment No. 12.) The winner (as determined by me) gets a box of Gitanes, a black turtleneck and the right to don a supercilious sneer. (Not really. I’m not giving up my black turtleneck sweater or my sneer. But I’ll send you a box of Gitanes if you like.)

Posted in Woodworking | 21 Comments

A Vintage Cottage Kitchen

exterior

Deciding to not sell my house right away has resulted in extreme laziness regarding the finishing touches to my kitchen. Everything is now functional; who needs toe-kicks, thresholds or shoe moulding, really? Plus, I’ve been busy with more pressing concerns: my dissertation, editing Roy Underhill’s delightful, funny and thought-provoking “Calvin Cobb: Radio Woodworker! (A Novel with Measured Drawings)” and copy-editing Peter Galbert’s book on Windsor chairmaking (which is wicked good).

Also, I’ve been out of town a bit, and the cats don’t give two paw swipes about how the kitchen looks; to them, it is merely the room in which food is always available…and treats are in the offing therein if they meow at me in a pitiful enough manner (read: in any manner).

While in North Carolina two weeks ago, I stayed in the the cottage above. It’s on Roy and Jane Underhill’s mill property, so it will be no surprise to learn that being there feels much like stepping back 80 years in time (despite the Internet service, air-conditioning and plenty of hot water).

Roy has been renovating the cottage (which I believe is where the keeper lived when the mill was in operation) for several years now, and the kitchen is almost done. Last year, I recall there being a late 70s refrigerator and stove; now, it’s decked out with period-appropriate appliances. When I do get around to selling my house and tackling a new rehab (preferably before my knees give out completely), I’d like to match the look of the appliances to the house’s period. But I like Victorians; it’s hell getting blocks of ice delivered these days.

fridgeoldstove

Adorable – but it doesn’t fit a boxed 12-pack of Diet Coke.

The “new” cottage refrigerator is adorable – but it hearkens back to a time when there weren’t as many readily available items that require cold storage…or maybe I need to cut down on the number of wine, Diet Coke and malt-liquor beverages I keep on hand.

The stove, however, is awesome – despite gas rings that are either fully on or off, and must be lit with a match. It did a fine job of heating water for morning coffee and evening tea – though past experience leads me to suspect the oven temps are a bit inconsistent (we had a similar stove when I was a kid).

stove

The rest of the cottage is decorated in a similar vintage nature, with period furniture, overflowing bookshelves, a wood stove for heating (I’ve never been there during cold months…are there cold months?) and an old typewriter at a window overlooking the woods and stream behind the trees.

fireplace

LR

Plus, there is a bust of Shakespeare beneath a picture of a cat. I felt right at home.

shakes

But now that I am home, I suppose I should attach that last piece of base moulding and get started on the toe kicks, backsplash, etc. Or not. Another few months of ignoring the missing/unimportant bits, and I’ll forget about them. How do I know? I finally completed the bathroom trim two days before putting the house on the market last summer. That renovation was otherwise finished six years ago.

Posted in Personal Favorites | 12 Comments

Hmmm…That Looks Familiar

islandlocale

I’ve been wrestling with the design for the island/counter/microwave shelf I want to make to fit the 22-3/4″-wide area between the door and window. While I quite like my decrepit antique farmhouse table, it simply doesn’t fit the space – I find it aesthetically vexing to have things hang over door and window trim and I don’t want to have a plonk a microwave atop the table or kitchen counters. I use mine so rarely (now that my gas stove is once again functional) that it makes no sense to have it taking up valuable flat surface area. Plus, I’d find that, too, aesthetically vexing.

The parameters are tight: 22-1/2″ is as wide as I can go (I figure a 1/4″ of wiggle room is a good idea), and it can be no longer than 52″. There must be a shelf for a decent-sized microwave, and I’d like a lower shelf for cookbooks and whatnot. But I have to avoid having a leg land in the floor vent area, and I don’t want to impede airflow from said vent. The final product also has to serve as a table, in order to call the kitchen “eat-in,” and I want to be able to store two stools under it, and get my legs comfortably underneath. (So yes, as soon as I finish the island, I’ll be obsessing over counter-height stools – whee!)

Here’s where I started:

island

I like the idea of a drawer in the apron, but that lowers the microwave shelf by 5″ – not a big deal to me, but probably weird to look at. I also had concerns about the whole thing falling over if I leaned too hard on the end. Or if a cat jumped on it. (JJ really needs to be put on a diet.)

Then I moved to this, thinking maybe the easier solution – one that allowed more leg room – was to face the microwave out on the end:

Iteration 1

Just awful. I abandoned this idea quickly, deciding I couldn’t make the shelf sides play nice with the tapered legs in the back. Were there room, I’d have played around with frame-and-panel construction for the shelf area, thereby using legs there, too. But no…not enough room (unless I got a uselessly small microwave…which, when I do decide to sell, would no doubt be unattractive storage planning to potential buyers).

So  I then took the legs away, with the intent to secure the top to the wall, and added a hanging drawer, a la Greene & Greene or a Shaker sewing table:

Iteration 2

Nope. Still ugly. What my antipathy boils down to, I think, is that I don’t want to see the microwave facing out into the center of the room.

Solution:

iteration 3

But no. This unit, with a drop-down door that hides the microwave, undermines the open feel I’ve been trying to create in this rehab project. Plus, there’s very little room for sitting.

But this one, I like. Looks familiar, eh?

Roubo iteration

It seems I’ll be building a “Roubo Microwave Island.”

If you wish to discover the dimensions, cutlist and joinery, c’mon over and see me at my other blog.

Posted in Woodworking | 20 Comments

Perhaps My Favorite Discovery

image

I’m sitting in a hotel room an hour outside Denver, and to kill a little time before leaving for the airport, I’ve been scrolling through my phone and wondering why I took some of the odd pictures thereupon (also, I’m a lot closer to being caught up on email than I’ve been in ages!).

But I know why I took the one above.

I don’t know exactly what it’s called, but that little neon greeny-yellow plastic shim thing for outlets? Brilliant! At least half the receptacle boxes in my house were inserted too deeply into the plaster, so I’ve had to live with recessed outlets for years (oh, the humanity).

Now, thanks to a three-cent piece of plastic, problem solved.

Would that the solutions to all my problems were so cheap and easy (though with a shorter discovery time).

Posted in Renovation/Restoration | 8 Comments

Fully Functional, if Not Quite Fully Finished

stveviewWhile I still have a few things to finish, my stove is once again hooked up, and the refrigerator is no longer in the living room.

I’d celebrate by using the appliances for the first time in almost three weeks by cooking a fancy meal…but that would require a trip to the grocery (the refrigerator is damn near empty; can I make anything out of hard cider, a bottle of wine, mayonnaise, milk and mustard? Oh – and a paintbrush wrapped in a damp cloth inside a plastic bag; I’m sure that would be tasty addition to any repast.)

fridgeview

Plus, it would require putting away all the crap that’s on the counters – and most of it is crap I still need.

Although I painted the baseboards last night and got most of them installed this morning (before my neighbor, Brian, helped me move the appliances back in place – thanks Brian!), the one on the back wall is going to need a few kerf cuts on the backside to more kerfeasily follow the serpentine plaster. While I might be able to force it in place with masonry nails, I’m worried the nails will eventually pop out of the soft brick…or pop out at one end as I drive the nails in at the other (as evidenced by that occurring on the sink wall behind the stove). So that piece will just have to wait until tomorrow. I’m not making a special trip out to the PWM shop for 5-10 kerfs (though I would were that run holding up real progress).

After that, there’s some paintable caulk to run at the top, a few small gaps to fill and sand at the corners and scarf joints, and plinth blocks to make and nail in place before a final touch-up with paint.

I also need to make transition strips for the three doorways, make and install the toe kick/feet under the cabinets, surface and install the beech I bought for the backsplash on the counters opposite the sink, make the island and come up with a plan for a narrow table with a top that follows the curve of the wall to the left of the stove (under which will be the cat-feeding station).

Ugh. Still a lot to do, actually. But at least I can boil the kettle for tea.

Oh, and I’ve decided to not sell just yet. I have too much else to do and don’t have time to deal with that on top of everything else. So I’ll get to enjoy my work for a while.

fridgep.s. I harbor longstanding enormous dislike of my refrigerator – it’s too big, plus the black sides and plastic handles are, to me, heinous (when I bought it 7 or 8 years ago, I thought the $450 I saved over the one I liked would render it acceptable. It has not.) Is it crazy to get a new, European counter-depth one (they’re narrower than the typical U.S. counter-depth models). I’m thinking the one at left (because the one I really want is three times as much…and that is indeed crazy). I’d get the somewhat reasonably priced one below, but apparently, I’d have to live in England to do so…which would be just dandy, actually.

Oh Ikea...why do you not sell this in the U.S.?

Oh Ikea…why do you not sell this in the U.S.?


Posted in Kitchen, Renovation/Restoration | 18 Comments

Glad I Saved that Coffee Filter

~wetpoly

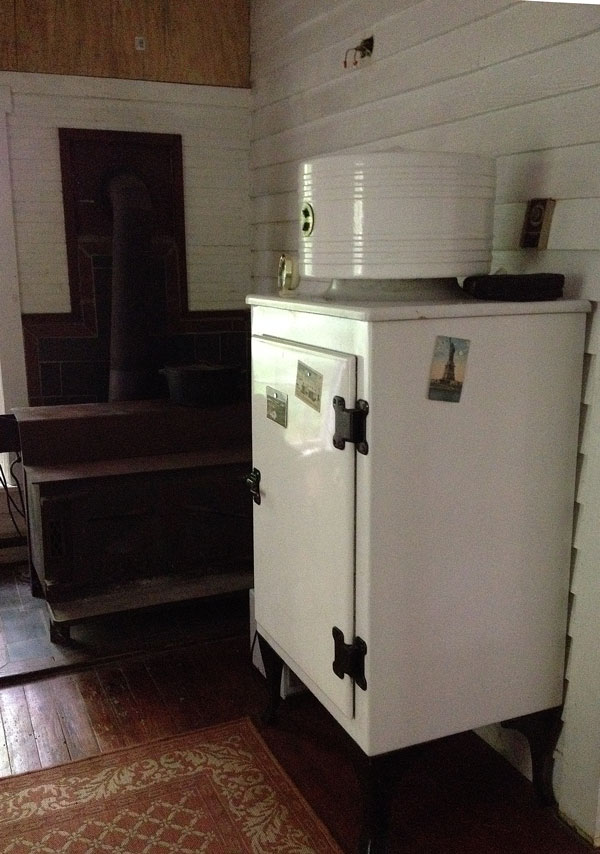
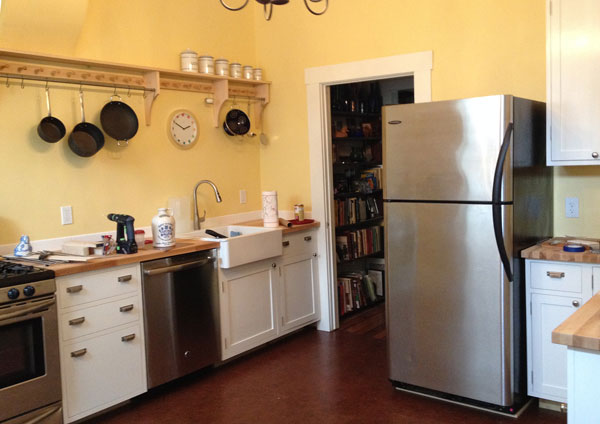
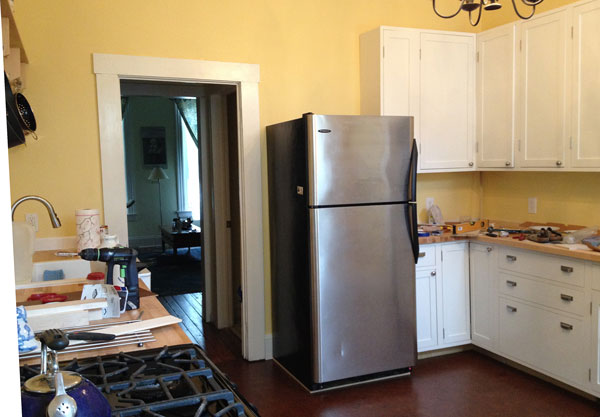
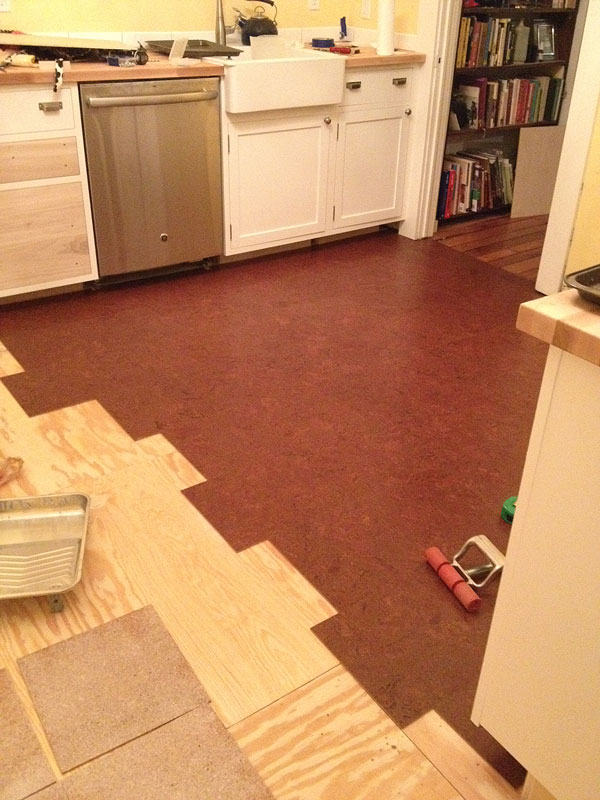
Since installing the cork tiles two weeks ago, my refrigerator has been in the living room (it’s a look), plugged in to a heavy-duty extension cord (I know, I know; it’s temporary). The stove is in the dining room, and useless without a gas hookup. I am tired of eating cheese and crackers, and have yet to find a frozen microwaveable meal that I like (to be fair, I’ve stopped looking). But there was one more step to complete before I can put the appliances back in place.

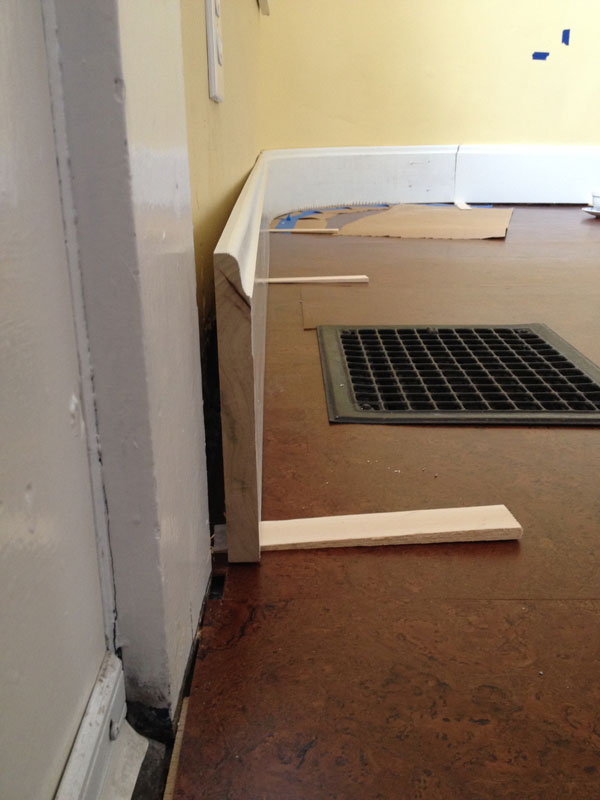
The cork manufacturer, APC cork, recommends that tiles in high-traffic areas, or in kitchens where wet things are likely to get dropped, get at least two top coats of Bona Traffic waterborne. Not only does the additional finish more fully protect the cork tiles, it helps to alleviate any “fullness” (tiles that are a couple thou thicker at the edges due to said factory finish) and to fill in any small gaps, thus keeping water, coffee or anything else from seeping in between. I’m a bit clumsy; it seemed like a good idea.

So last Friday night, in a probably vain attempt to get my life back together (for now, I’d settle for the kitchen being fully functional) I stayed up late to get both coats on, with three hours’ dry time in between. (Once the hardener is added, you have only four hours’ shelf life before it starts to degrade).

After cutting a couple pieces of cardboard to serve as doors/cat barriers, I did my best to get everything out of the kitchen I thought I’d need for the next several days. Ideally, one should stay off the fresh finish for at least 48 hours, and walk on it only in socks for five days longer. I stashed everything I thought I’d need in the dining room.

~scuffedI didn’t occur to me that I’d need my prescription pain meds; I take them rarely indeed. When I do need those pills, it’s because a) my knees hurt (too many years of soccer) or b) my shoulder(s) hurt (tendinitis following several surgeries to address multiple dislocations).

Then, I spent the next three hours on my knees while sanding and slinging poly. Oops. (I resorted to Irish medication; the liquor cabinet is in the dining room.)

The first thing was to ruin (temporarily, I hoped), the perfectly nice factory finish that was already on the cork tiles by scuffing it all up with a #150-grit sanding block.

Then, I mixed the hardener into the finish, gave it a thorough shaking and let it sit the requisite 10 minutes. When I opener the bottle back up to insert the “supplied strainer,” I discovered that it was not, in fact, supplied.

~goldtoneSo I panicked for about 10 seconds, until I remembered the wire mesh filter I’ve never used that came with my coffee maker eight years ago. (No idea why I kept it, but glad I did.) The mesh was a little small and clogged easily, but I just kept swishing things around and got it to work. (Really, the most amazing thing is that I was able to quickly find it in the pandemonium that is my dining room.)

I used a painting pad to apply the finish; there are enough cabinet toe kicks to get under and edges with which to deal that it wasn’t worth buying a proper finish roller setup (though my knees might say otherwise).

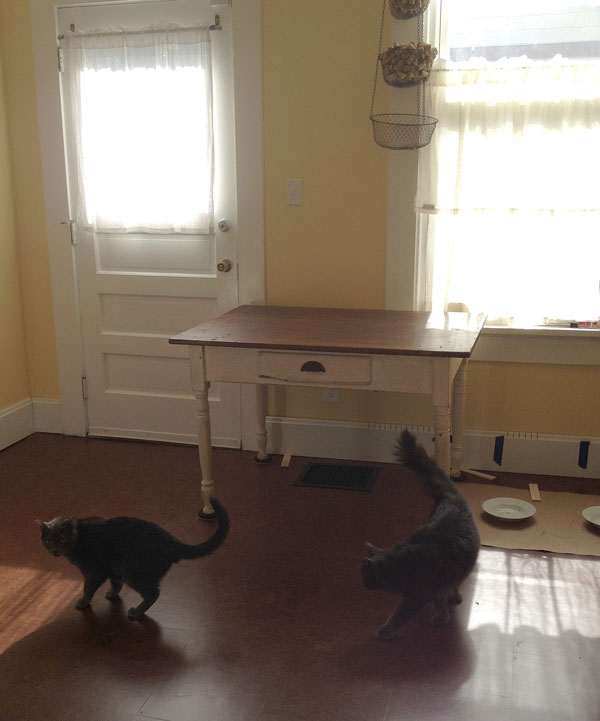
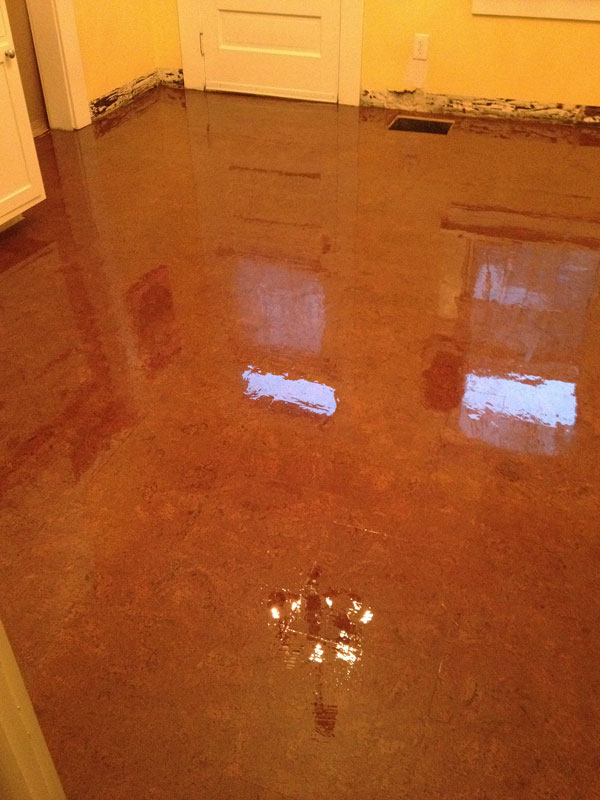
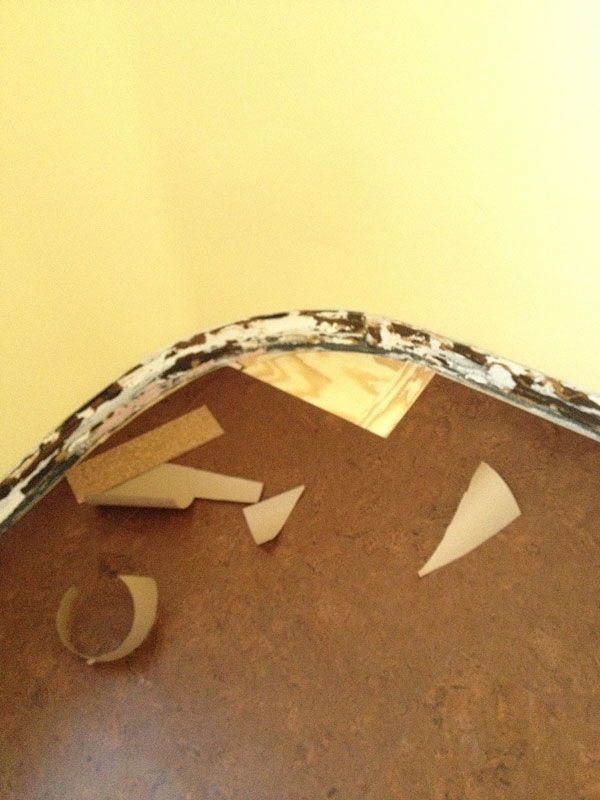
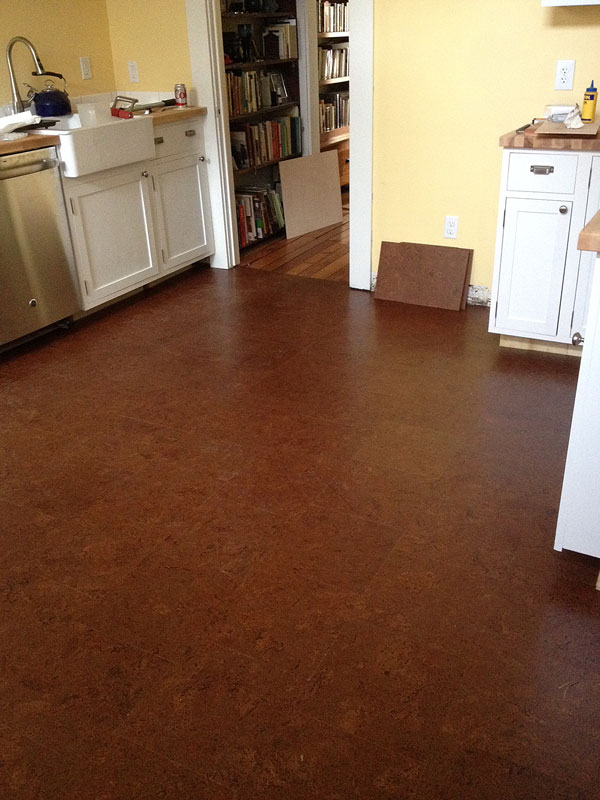
I’ve not yet been in the kitchen; I’m waiting as long as possible (we’ll see if I can make it to Saturday…), in large part because I know the cats will run in as soon as I move the cardboard “doors”…and I can’t get the cats to wear socks. But I did stick my phone around the cardboard to take the shot below. You can see a little telegraphing from an uneven join in the underlayment; I expected that. It’s an old house, and some things, you just have to get over – or never let them bother you in the first place.

~Islandlocal
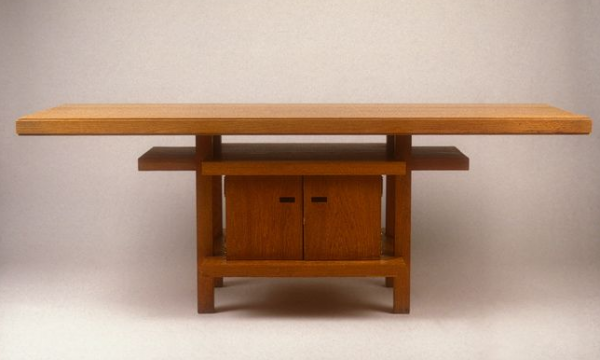
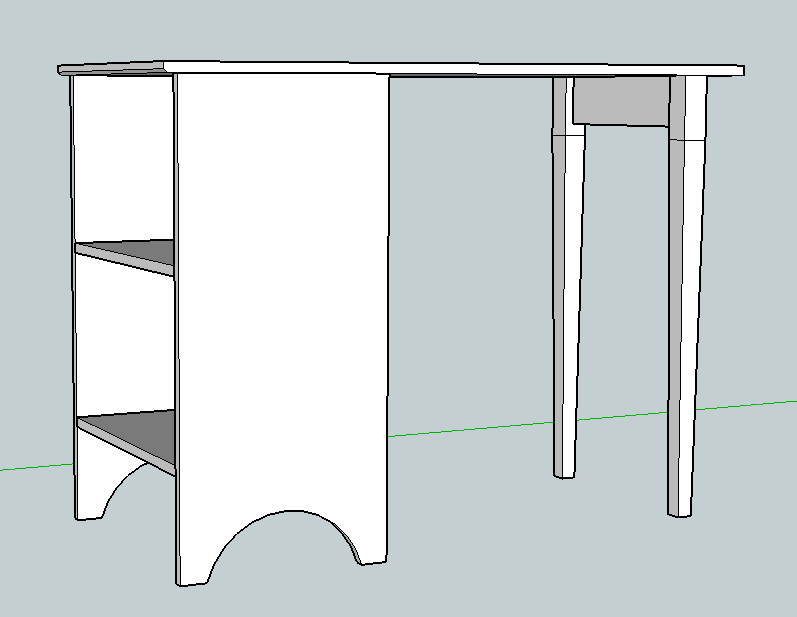
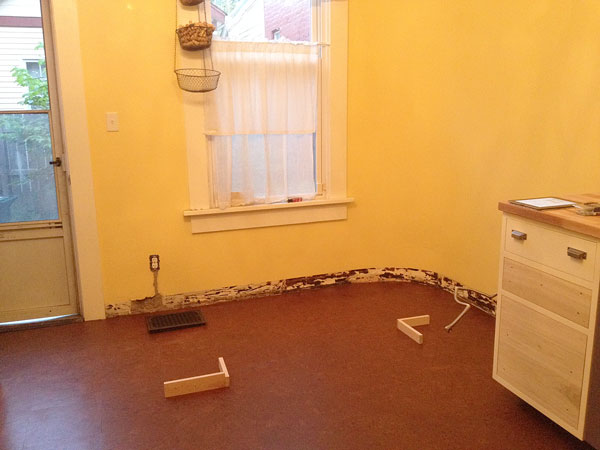
So right now, as I wait to install baseboard then put back the appliances, I’m playing with ideas for an island/table/place to stash a microwave for in between the door and window. (Note that I’ve looked everywhere for one to buy, but nothing commercially available fits.)

Here are the challenges: it has to be no more than 22-1/2″ wide, and the legs have to clear the window trim that juts 2″ into the available space. The top can be no longer than 48″ (so as not to impede traffic flow). It must be 35″-36″ high. I want a table look (mostly because I prefer it, but also because of the heat vent), and it has to be on fairly thick legs to spread the load and thus not leave dents in the cork. The area for the microwave (a small one) has to be at least 25″ w x 15″ h x 20″ deep, and I don’t want to be able to see the back of the microwave. For the table part, I want to be able to slide two narrow barstools underneath when they’re not in use, and user legs need to fit under the table comfortably. Not that I’m picky.

Below is what I’ve been noodling with, but it needs work. There’s a drawer across the front…in my head, if not in the SketchUp file. I’m toying with slats rather than a solid shelf and solid back. And the legs need a bit of flair. At the moment, I’m thinking the same 1-1/2″-thick butcher block countertop as in the rest of the joint for the top, and a slight taper on the legs to pick up on the Shaker-style cabinets…but I might decide on contrasting stock in 3/4″-thick something or other for the top, and I might go crazy and do through-tenons or something on the shelf or aprons or both. While I like the concept of everything matching in style, materials and color, I’m leery of having it it feel a little too “Garanimals-like” in reality.
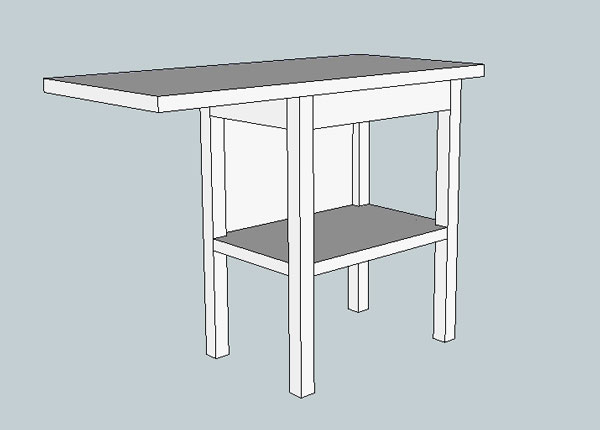
island


Posted in Kitchen, Renovation/Restoration | 7 Comments

Three Drinks has me Thinking ‘Ikea’

night1

Last night, after completing various neighborhood pet-sitting duties and setting the backsplash tiles, I decided to get over my first-timer’s fear and start in on the cork tiles. That was at 10 p.m. I got as far as you see above by about 1 a.m., and called it a night.

I was cutting it close on my tile supply from the get-go, because I didn’t want to pay for another entire box. But by my triple-checked calculations, as long as I made no more than a couple mistakes, I’d still have 15 or so 12 x 12 tiles left over. I did not, however, remember my daring tile order when I decided against a cabinet to the left of the stove.

This curved corner was fun. I cut paper templates, then traced around them onto the cork with a sharp utility knife.

This curved corner was fun. I cut paper templates, then traced around them onto the cork with a sharp utility knife.

At 1 a.m. Saturday morning, I wasn’t sure I’d have enough. And the store where I got my supplies is open on Saturdays from 10 a.m.-1 p.m…plus the tiles would have to be ordered, and it’s a holiday weekend. So at 6 a.m., I was back at it; I wanted to know quickly how pissed off I was going to be at myself for the next several days. (And I wanted to get my order in ASAP, if needed.)

Luckily, in large part because of the square footage not being evenly divisible 12, I had a fair number of rip cuts to make that resulted in scraps that were large enough to use against other walls/doorways/bases/etc. (Except is it really lucky to have had to fiddle so much? No. No it is not.) When all was said and done, I had four full tiles remaining – a very close call.

Cork is easy to cut; a sharp utility knife can make it through in three to four passes – which is good, because I’ve a pesky curved corner that no table saw could handle. For the many straight cuts, the table saw works like a charm. As much as I hate going up and down to the scary basement and as bad as the light is at my saw, that little Bosch saved me a lot of time.

stringing

Got a small gap? Think string inlay (in the same species, color and pattern).

It also came in handy in helping me to fix a wee problem. Somehow, I got a little off on a few tiles, which resulted in having to fill narrow gaps in a few places at the staggered joints. On the table saw, I was able to rip 1/16″-wide strips off the springy cork (I backed it with 1/4″ ply so I didn’t lose the tiny offcut), and tap them down into place. It’s rather like string inlay – with the notable exception that I don’t want the strips to stand out. And they don’t. After two coats of waterborne poly (Bona “Traffic”), they’ll not show even less.

Cork is also pretty easy to install. The adhesive I used has a three-hour open time (if you coat the floor and the tiles at around the same time; if you pre-coat the tiles, the working time drops to an hour with the floor’s adhesive). I rolled the stuff on both (working with about 12-15 tiles at a time, and coating the appropriate area of underlayment), waited for it to turn clear(ish) and dry to the touch, then defended the prep against cats while the adhesive flashed. Then, it was just a matter of aligning the first one with the chalk lines I’d dropped near the sink, and working my way out, pounding each in place with a rubber mallet. Each row is staggered 3-1/2″ from the previous one. (No real reason other than it looked good to select 3-1/2″.) After every 12-square-feet or so, I used a J-roller on the joint lines.

Other than those few aforementioned gaps (an easy fix), I’m pleased with how it turned out. And delighted to not have to wait for another box of cork tiles to arrive. But I do still have to screen it and apply the two poly coats (a 2-day process).

The sticks to the right of the window denote the corner of the stove; the center ones denote the proposed island location relative to the wall and stove.

The sticks to the right of the window denote the corner of the stove; the center ones denote the proposed island location relative to the wall and stove.

And that got me thinking about everything else that’s left to do…so I had three drinks with dinner, in an effort to make myself take a break, because I’ve been working on the kitchen almost non-stop (but for work) for weeks…months. I just need a few hours of not working. (Though I’m pretty sure I could grout whilst tipsy.)

There’s still a minor wall repair to make where my neighbor moved an outlet up above the baseboard line (thank you neighbor…I just didn’t have the time), baseboards to run and install (including a kerf bend around the curve), a countertop-height table with a curved top to fit in to the left of the stove (I hate that curve), three drawers still to paint and their hardware to install, the backsplash tile to grout and a kitchen island to make. It’s that last one that has me thinking Ikea. I can only assume it’s the alcohol talking. I might just listen.

finished


Posted in Kitchen, Renovation/Restoration | 13 Comments